Sunday, 23 January 2011

A Moroccan Menu

January is always a Fire Food challenge. Fortunately, we had planned a dinner party for a few lovely friends and after trawling our library of recipe books found a main course that would define the Moroccan theme for the evening.

Then began the research. Choosing a theme is great because it focusses the mind and provides a framework for deciding the menu. Hankering for some warmer weather and desperate to burn some charcoal, a Mediterranean/North African meal just felt right.

Moroccan food culture is wonderfully ritualised and steeped in tradition. Loads of lovingly prepared courses are designed to delight and comfort the guests. Sometimes dozens of tiny courses are served, usually local dishes and prepared over a period of days. Bread making takes on an almost religious role, families use their own traditional recipes and the children take the loaves to communal ovens for baking.


Our UK lifestyle required a practical adaptation to the Moroccan approach. We planned the meal around three courses, where the Moroccans may have turned the same meal into six or seven:

FIRST COURSE: Moroccan spiced chicken skewers with parsley, almond and feta, home made unleavened bread and mint yoghurt

MAIN COURSE: Lamb with anchovy and harissa, sprouting broccoli and slow roasted tomatoes

DESSERT: Cinnamon oranges

The skewers and unleavened bread would be cooked over charcoal on the Weber to keep the smoke out of the kitchen, and the lamb was to go in the oven.

The starter is from a recipe we found at waitrose.com, the main course came from the 'Autumn' section of a fabulous cook book "A Year in My Kitchen" by Skye Gyngell, and the desert recipe was discovered at eHow.com under "Easy Moroccan Desserts" .


I got back from food shopping some time after 2pm and loads of various elements needed preparing. I was lucky to have just enough time before my guests arrived at eight. As usual, I prepared a plan. It began by toasting and grinding the spice mixes by hand, one for the kebabs and one for the harissa. Several large red peppers were blackened under the grill and their skin removed (for the harissa). 6 cloves of garlic were then crushed for the chicken rub and harrisa, and another two cut into slivers for the lamb.

The slow roasted tomatoes would take 3-4 hours at 100 degress, so they went in the oven. Medium sized red ripe vine tomatoes were halved, sprinkled with a bit of salt and sugar and laid out, cut side up, on a baking dish.


To feed eight, I bought two small legs of lamb. I was worried that one large leg might not do and was hoping for some leftovers anyhow. I removed the bone from each leg and 'butterflied' the lamb. I laid the lamb skin side up in a large baking dish before poking holes every 3-4cm with a paring knife and pushing a sliver of garlic and half an anchovy fillet into each one. I brushed the lamb with melted butter, seasoned it with lots of pepper and a bit of salt, covered it with foil and put it aside at room temperature.

The recipes required coriander, mint and parsley, so I chopped them finely and put them in sealed containers in the fridge.

The spice rub for the chicken skewer starter is a delightful mixture of coriander seeds, cumin seeds, cinnamon, cloves, saffron, turmeric, garlic, salt, lemon zest and olive oil. The recipe called for boned chicken thighs, but I opted to use breast instead. My charcoal fire was going to be hot and the risk was that thigh may have been undercooked when burnt on the outside. Breast takes minutes to cook and should be just lightly charred on the outside.

Following the quantities in the waitrose.com recipe, there was an abundance of the spice rub. I used four chicken breasts for 8 small skewers, and each cube of breast was thoroughly coated into what became an intensely aromoatic crust after just a few minutes of char-grilling. I used metal skewers (even soaked bamboo skewers would not survive this kind of heat) and put coriander leaves between each cube of chicken.


The parsley, almond and feta salad came out very differently to what the recipe intended. Firstly, after visiting two major supermarkets and the fruit and veg stall at our local market, flat leaf parsley was nowhere to be found. Curly parsley only. I prepared all of the ingredients, crumbled the feta, toasted and chopped the almonds, chopped the dates and added the parsley. Possibly something to do with the type of feta I used, but mixing it all together, however gently created something that resembled more of a dip than an salad. Nonetheless, the flavour was great and it would still look good on the mezze style plate for the starter.


For the unleavened bread I used my favourite method. Basically an Indian chapatti recipe, but using plain white flour instead of wholemeal, and olive oil instead of ghee. I made the dough a couple of hours before the guests arrived, wrapped it in foil and left it at room temperature. I made enough dough for 4 small flat breads (1 cup of flour) so each starter plate could be served with two quarter pieces.

The minted yoghurt to be served with the starter was basically a Greek tsatsiki recipe, using drained grated cucumber, a mixture of fresh and dried mint, crushed garlic, a squeeze of lemon and a bit of olive oil. I made this in advance and put it in the fridge to chill.

I prepared the harissa in the food processor, being careful not to put in too much chilli, covered it with cling film and left it room temperature. Meanwhile, my lovely wife prepared the cinnamon oranges and put them in the fridge.

Finally, I washed and trimmed the broccoli, prepared a light, herby stock with a bit of saffron added for the cous cous (to be prepared just before serving).

With the guests arriving at eight, I had just enough time to clear up the kitchen and put some decent clothes on. I would put lamb in the oven and light the charcoal once the guests arrived and hoped that the rest of the timing would all fall into place.

By 8:15, they had all arrived. After we provided everyone with a drink and made the necessary introductions, the lamb went into the preheated oven and I lit the Weber chimney starter. This meant 20 minutes before I could grill the kebabs and make the bread, and an hour before we could serve the main course. The recommended cooking time for the lamb was 40 minutes plus resting, 20 minutes under foil and 20 minutes to brown the skin side.


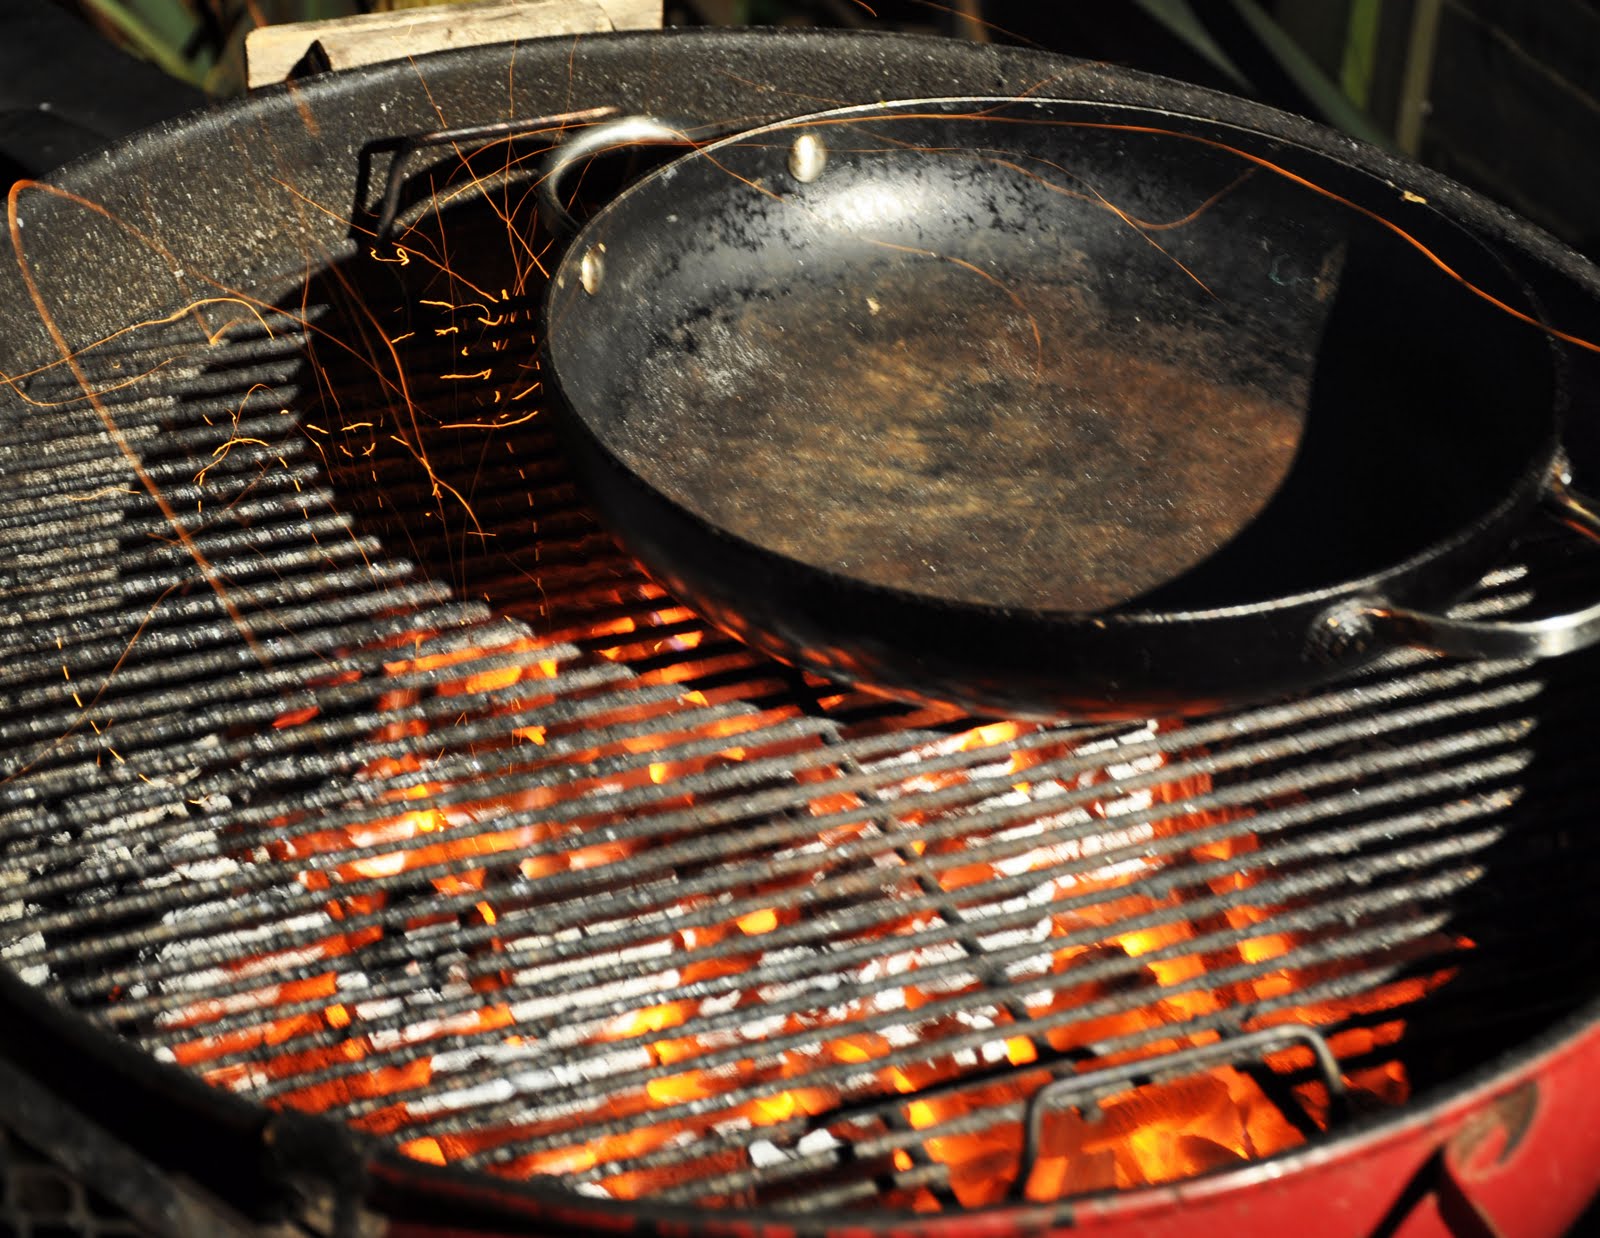
Whilst waiting for the charcoal fire to mature, I rolled out the four flat breads and wrapped them in a tea towel to stop them drying out. As planned the coals were searingly hot in good time so on went the paella pan to heat up for the bread, on on went the skewers. I was constantly moving them about to stop them burning whilst cooking the flat bread and wrapped them in a cloth to keep them warm. The whole thing took just a few minutes, five at the most, and the starter was ready to serve.

I covered the skewers with foil in the hot pan I had used for the bread to keep them warm back in the kitchen whilst the feta, parsley and almond "salad" and tsatsiki were spooned out. I finished off the plate with the hot skewers, pieces of flat bread, a lemon wedge, a single caper berry and a sprinkling of fresh coriander leaves over the chicken.


Needless to say, it went down a treat. The sweet and sour provided by the feta and dates, refreshment from the yoghurt, lemon and mint, and the intense complex flavour of the marinated chicken worked for me. The starter was sufficiently substantial to bridge the 30 minutes or so before the main course would be ready.

For the main course, all there was left to do was steam the broccoli, prepare the cous cous, carve the lamb and serve it up. Using my just sharpened carbon steel Opinel knife, I carved the lamb into thin slices across the grain of the muscle and returned them to the baking dish to keep warm under foil. I put the dish on the hob with a gentle flame to keep the pan juices hot for serving.

The sliced lamb, brocolli, pan juices and harissa were served on to warmed plates and garnished with two roasted tomatoes.


The lamb was not pink (I had left it in a bit longer), but very tender and full of flavour with the anchovy fillets and garlic slivers providing extra little bursts along the way. The harissa? Well I was impressed. Complex flavours from the spice mix, just a bit of bite from the red chilli and all that elevated freshness from the coriander leaves. Unfortunately, I had overcooked the broccoli, which was a shame, but it was all eaten all the same.

After a reasonable break and plenty more wine, my lovely wife served up the pre-prepared cinnamon oranges. Wow, nothing like I have ever had before. Juicy chunks of orange mixed with slivered almonds, finely chopped dates, lemon juice, ground cinnamon and a bit of castor sugar. The refreshing, cleansing effect was a perfect finish to the meal.

Wednesday, 29 December 2010

Christmas Turkey on the Weber - Chapter 4

SUB-ZERO OUTDOOR COOKING - CHRISTMAS 2010


After a week of snow and freezing temperatures, Christmas day promised to be dry, sunny and very cold. And that it was. The temperature fell to minus ten degrees C overnight and peaked at an invigorating minus four sometime during the daylight hours.

We planned to have our Christmas dinner at around 6pm, so the cooking was done in the afternoon. I was slightly anxious as I wasn't sure how to compensate for the extreme cold (no insulation in a Weber!). To avoid any fire starting delays I deployed the Weber Chimney Starter and loaded it to the top with good quality, dry lumpwood charcoal that I had been storing in the house. I had a total of about 4kg and was starting to worry whether it would be enough as it was seriously cold outside.

We went to a Christmas service in the morning, and then by the time we had done a round of present opening and had a bit of lunch, I lit the chimney starter at about 1:15pm. We had a 8.5kg (17 pound) turkey plus a layer of stuffing between the breast and skin. I'd looked up the cooking time for the bird weight at 3hrs 10mins plus a bit extra for the cold weather (I guessed a mere 10 minutes). As the stuffing is to protect the breast, it doesn't affect the cooking time of the thigh so I made no further adjustments.

The cooking and checking timetable worked out something like this:

13:15 hrs - Lit chimney starter
13:40 hrs - Turkey in Weber
14:00 hrs - Checked turkey/fire and took photo (top). Sizzling nice and gently, skin starting to brown, anxiety decreasing
15:05 hrs - Fire a bit low, so added a bit of charcoal to both fires
15:50 hrs - Checked, all ok
16:30 hrs - Added a bit more fuel (total fuel used approx 3-3.5kg)
17:00 hrs - Removed turkey and covered with foil (total cooking time 3 hrs 20 mins)

I let the turkey rest for about 45 minutes before removing an entire breast with its stuffing layer. This was enough to feed six hearty appetites and was on the table at 6pm as planned. Our vegetarian daughter had all the trimmings served with a vegetable stock and garlic gravy I made separately.

I served the turkey with the traditional accompaniments of stuffing, giblet gravy, pigs in blankets, roasted potatoes and parsnips, steamed carrots, brussel sprouts and home made bread sauce.

This left us with an entire breast (for turkey pie which we had yesterday), and the legs, thighs and wings for turkey lasagne. The carcass is currently simmering away in the kitchen and will provide us with some good stock for the lasagne and what's left will go in the freezer for soups, sauces and gravies.


For the original post have a look at Perfect Christmas Turkey on the Weber where you will find loads more detail, photos and links to other recipes.

Saturday, 4 December 2010

Christmas Turkey on the Weber - Chapter 3

THE STUFFING

To complement my original article Perfect Christmas Turkey on the Weber and the recently posted photo gallery from our 2009 Christmas turkey, this is an ideal stuffing to layer between the breast and the skin. Don't worry if you make too much, it can be rolled into little balls and baked separately.

You can make the stuffing and stuff the turkey on Christmas eve and leave it in the fridge for cooking the next day. This really takes the sting out of kitchen duties when the kids are all desperate to sit around and open their presents.

I use a whole tube of good quality sausage meat, with about the same volume of fresh breadcrumbs (made in the food processor). then add the juice and grated rind of a whole lemon and lime, and plenty of seasoning. The stuffing just needs to be mixed well before working it between the skin and the breast. The stuffing layer can be at least an inch thick. It protects the breast from drying out beautifully and is a treat in itself.

Friday, 3 December 2010

Christmas Turkey on the Weber - Chapter 2

PHOTO GALLERY

For the full story, method and cooking times, have a look at my original article, Perfect Christmas Turkey on the Weber. These photos are from our 2009 Christmas turkey experience at home in Oxfordshire (another 20 pounder) and will hopefully help to entice you further towards striking that match!


Sunday, 14 November 2010

Perfect Roast Duck in the Weber

Cooking duck indoors can be a smoky affair, especially in the winter when the house is tightly closed up. Our local shop had fresh duck on offer, so I grabbed two, one for dinner and one for the freezer. It was only after bumping into a neighbour in the shop that the idea of cooking the duck in the Weber came about. She had recently roasted some duck legs and found the duck fat smell in the house fairly overpowering and long lasting.

Our normal winter Sunday evening roast is a fairly random rotation of chicken, beef, pork, lamb and gammon. The duck idea freaked the young ones out a bit, but when they remembered how they loved Chinese crispy duck pancakes they relaxed a bit.

The Weber is just ideal for cooking duck. The high starting temperature gets the fat melting and skin crisping up straight away, and as the temperature subsides during the hour and a half or so of cooking time, the meat cooks more gently finishing off soft and moist inside. I followed Hugh Fearnley-Whittingstall's Meat Book as a guide. This included the giblet stock for the gravy, but I added a tomato to his stock recipe, and a spoonful of cranberry sauce to the gravy.

The Weber guides never tell you this, but I always use a rectangular roasting dish rather than just sitting the meat on the grill. This retains all of the fat which is a must for basting. I have a pyrex dish which is perfect for this.

I made a plan for the afternoon, working out at what time I needed to light the fire, put on the duck, prepare the other veggies and so on. I filled my fairly new Weber Chimney Starter with good quality lumpwood charcoal and a piece of newspaper. I had allowed 20 minutes for this, but the charcoal was in paper packaging and was stored outside (under cover) so had become a bit damp. The chimney starter took twice as long, and the meal time was bumped further away as a result.

The starting temperature is much higher in a Weber than the 200 degrees C oven temperature recommended, so the roasting started off with a real sizzle. After the first half hour, the skin was browning nicely and it looked like I wouldn't be needing to top up the charcoal at all during the roasting. In fact I was getting worried that the outside might burn before the inside was done. An hour in, the temperature was still high and there was a lot of smoky fat spitting away in the roasting dish. I gave the duck a good basting and let it get on. Another 15 minutes in and I was still worried. I gave the thigh a poke with a skewer and from the steam it was clear that the duck was still very moist. I just hoped that I hadn't put too much fuel in at the beginning. Luckily the fire did what it was supposed to do and eased off towards the end so that by the time the 90 minutes were up, it was an aromatic, gentle sizzle.

I took the duck out of the Weber and covered the baking dish with foil to rest before carving and set out to make the gravy from the giblet stock prepared earlier. Following Hugh's advice, the breasts were removed whole, and the legs and thighs separated from the carcass. The breast was sliced thickly and offered with either a leg or thigh when served.


I was really surprised as to how moist the flesh was and how tasty the crispy bits were. There was also the distinctive smoky taste from the Weber that reminded me of the Christmas Turkey we had last December. The breast was almost creamy in texture, and the legs moist and savoury.

We had our roast duck with steamed carrots, roast potatoes, cauliflower cheese, peas, gravy and some shop bought cranberry sauce. And, the kids loved it.

I found a new home for the charcoal indoors so next time it should be nice and dry.

Sunday, 7 November 2010

Aussie Damper Bread on a Stick - Chapter 3

GUY FAWKES WEEKEND

And also our lovely Luca's ninth birthday. After igniting a fair sized box of fireworks in our friends Katie and Cai's garden, I spontaneously decided to make a batch of damper dough for the kids to bake on the fire in the brazier.

The simple mix of self raising flour, milk (or water) and a bit of salt was mixed in a bowl, kneaded to a light dough, and wrapped in foil for a while until the fire subsided to embers.

Cai's son Louis was sent on a mission to find sticks in the garden the thickness of his little finger and about 50cm long. He returned with some bamboo gardening stakes which were just perfect. Cai sawed off the ragged ends and washed the dirt off them before I worked a small ball of dough a bit larger than a golf ball onto the end of each one for the kids to slowly roast over the embers.

The kids took their damper and rotated them constantly and slowly over nice hot spots above the embers for about 15 minutes until the damper expanded to about double the size and was a lightly toasted colour on the outside. For the kids 15 minutes was an eternity, constant cries of 'mine's ready' were countered by me reassuring them that it would be worth the wait.

After being removed from the sticks, the dampers were broken open, buttered and topped with jam, Marmite, whatever. They loved them.

For the recipe look at Aussie Damper Bread on a Stick.

Sunday, 24 October 2010

Ben's Built-in Braai - Chapter 3

THE OFFICIAL OPENING


Attended by all those who helped plus spouses and kids, this was a great night and one to be remembered. For his architect (me), his builder (Rob), his South African neighbour on a spade (Riaan), his South African friend on a spade (Dean), wives, young'uns and Riaan's sister who was visiting from South Africa, Ben and Tersia put on a proper feast and celebration.

Oxfordshire's autumnal weather kicked off with a heavy rain shower before the guests arrived, but the night stayed respectfully still, cool and dry for the occasion.

We could smell the wood smoke and spices as we approached his house on foot. When we arrived the braai was in full flame and the potjie was simmering gently with just a few embers below it. A hardwood fire was blazing in the back corner of the braai to provide warmth for the guests and a supply of embers for the potjie and braii tool (grilling rack) when needed.

We blokes hung around by the new braai admiring the set-up and talked long and hard about our barbeqeing memories. I obtained an insight into the long and sophisticated tradition of cooking with fire in South Africa. This is so unlike Australia where as a child I was often horrified at how grown up friends and relatives could so easily destroy my food. Fortunately Australia's barbequing culture has moved on since the 70's. It will although never have, in my opinion, the depth of the South African tradition as it has always been a suburban pursuit rather than a rural one.

Given the number of guests and the age range (11 adults and 8 kids) Ben deliberated long and hard about the menu for the milestone event. For the first course he made chicken tandoori kebabs served with poppadoms, home-made raita and salsa plus a sweet chutney. Boerewors sausage was grilled for the kids so they could get on to watch TV and play games.


The main course was a slow cooked lamb curry, spiced rice, saag aloo and naan bread. For dessert Tersia produced a gorgeous white chocolate panna cotta.

Chunks of lamb on the bone were meltingly tender and the handful of garam masala thrown in ten minutes before serving was Ben's special trick to intensify an already wonderful taste and aroma.

Under no pressure at all (yeah right) Ben has so generously provided his recipes because basically I gave him no choice.

Get yourself a local architect and builder and you can have one all of your own. Go on, you know you want to.


Tandoori Recipe:

Ingredients:

1 pint of live natural yogurt
1 Tablespoon Cumin powder
1 Tablespoon Garam Massala
1 Teaspoon Coriander powder
1 Teaspoon Turmeric powder
1 Teaspoon Chilli Powder
Juice 1 lemon
8 cloves garlic - crushed
1 inch grated ginger
Red food colouring
4 pieces of skinless chicken on the bone
1 Lemon

Method:

Mix the spices, colouring, lemon juice and garlic and ginger up into a paste with a little water and stir in well with the yoghurt. Marinate for 12 hrs. Shake off excess marinade and place chicken pieces on skewers. Braai for 10-15 minutes and check the chicken is cooked by piercing the thickest piece with a skewer, if the juices run clear it's cooked, serve with a wedge of lemon.


Curry recipe:

Ingredients:

2 kg of lamb stewing meat
Two tins of chopped tomato
3-4 Stems of finger length fresh ginger, peeled and grated.
5 cloves garlic chopped finely or crushed to paste
4 large onions sliced finely
4 large carrots chopped
4-5 medium potatoes cut in quarters
1 teaspoon fennel seeds
1 teaspoon Cumin seeds
1 teaspoon ground cumin
6 cardommom seeds crushed
4-5 Star anis pods
1 Cinnamon stick
2 tablespoons Garam Masala
3 tablespoons of Mild Curry powder
1 tablespoon Turmeric
3 bay leaves
Salt and pepper to taste
Chilli powder to taste, half teaspoon for mild
Lamb stock 2-3 tomato tin full
Fresh Coriander for garnish
Chopped almonds if wanted for garnish

Method:

Brown meat in veg oil. Remove from pot. Brown onions with garlic ginger and all spices. Do not let it burn. Add meat and juices to onions and spices. Brown for a further few minutes and add tomatoes. Put two tomato tins full of stock in now as well. Cook slowly until meat is almost tender(1-1.5hrs). Add carrots and potatoes and add another tin of stock. If curry is to dry to your taste, add more stock. Season. Cook for another 30 min until potatoes are cooked. Take off heat for at least 25 minutes. Best to cook previous day. Garnish with Fresh Coriander and almonds.


Saag aloo recipe:

Ingredients:

7-9 medium sized potatoes of your choice, cut into quarters
4 garlic cloves, chopped
1 teaspoon turmeric
1 teaspoon garam masala
A few Cumin seeds and fennels seeds Teaspoon in total
salt and pepper to taste
1/2 teaspoon dried chilli/chilli powder (or more if you like it hot!)
1/2 teaspoon mustard seeds
Fresh spinach, a good few hands full, dont cut
Water for boiling
Vegetable oil for Frying

Method:

Par boil the potatoes. Heat the oil in a pan over a medium heat then add the garlic and spices. Drain the potatoes once they are ready and put them in the pan as soon as the garlic begins to turn brown. Turn up heat. When the potatoes are brown, add the spinach and once the spinach has wilted, turn off the heat.


Tandoori Chicken on FoodistaTandoori Chicken
Related Posts with Thumbnails